Building a Secure AI Bot for Private Data

Dev Parigiri
AI
min read

LLMs (Large Language Models) are currently the center of attention in the AI community. With the advent of GPT-4, LLMs have become so mainstream that developers are closely integrating these models into several applications. While traditional LLMs are amazing for most usecases, they tend to fall short when you want to use them out-of-the-box with private data. While you can integrate your private data with GPT-4 through their APIs, it is not the best idea since you don’t want your sensitive data being sent to third-party servers.
Tackling the security issue
The only way you can be sure that your data is securely processed is to make use of open-source LLMs which give you total control and flexibility.
What are the advantages?
Get away with using even a 7B parameter model by proper prompt-engineering and fine-tuning
Using lower parameter LLMs are computationally faster and quantizing the model makes it even more efficient leading to lower operating costs
You have end-to-end control over the entire process so the data stays on your servers
Easily customizable to meet your growing requirements due to the open-source nature
Contents
Creating a simple front-end chat interface with 🐍 Flask
Downloading the 🦙 LLM
Collating and processing private data with 🦜🔗 Langchain
🦜🔗 Langchain Retrival QA object for vectorDB similarity search
Creating a custom prompt template
Step 1:Creating a simple front-end chat interface with 🐍 Flask
For our user interface, we will use Flask to create a simple webapp. There will only be one dynamic page where you will interact with the LLM. To get started, go ahead and clone this github repo for the entire code. I suggest you only use the code for the front-end and custom write everything else based on your needs!
The code is very simple since we only use the front-end for getting the user query and returning the result. If you want to understand more about the formatting of the response, check out the main.js file under the static/ directory.
Step 2: Downloading the LLM
The LLM of choice for this usecase will be LLaMA-2’s 7B parameter chat model. This is a good choice for inference on a generalized set of private data. Feel free to explore other LLMs which you think might suit your usecase better.
For instance LLaMA fine-tuned models like Vicuna is a good option if you have a lot of instruction based tasks and Koala if you have dialogue based tasks. If you want to know more about which LLM fits your needs best, check out this LLM Index from Sapling.ai.
In this blog, we will be performing a CPU based inference. To do so, we will be using the GGML format of the LLM since it significantly increases the computational efficiency by utilizing various optimization techniques (primarily quantization).
What is GGML? Quantization?
GGML is a tensor library written in C++ that makes use of integer quantization and other optimization algorithms such as ADAM and L-BFGS to enable LLM inference in a CPU-based environment.
The main optimization lies in the quantization where the model weights which are floating point numbers are compressed to 4-bit or 8-bit integer formats. This reduces the precision of weights leading to a hit in performance but drastically improves efficiency since the RAM and Disk usage is significantly lower. If you want to know more about quantization, check out this page.
Downloading the LLM in GGML format
You can download the LLM of your choice from here. For this blog, I will be using the basic LLaMA-7B-Chat version. If the LLM you want to use is not already present in the GGML format on huggingface, you can always convert it to GGML locally by following this video and this github repo.
Using the LLM in python with 🦜🔗 Langchain
For using the LLM with python, we need to make use of python bindings that allow you to pass data or call functions between Python and C++ in this instance. To do this, we will be using the CTransformers library from Langchain.
Step 3: Collating and processing private data with 🦜🔗 Langchain
Now that the LLM has been downloaded, the next step is to create our vector database with our personal documents. Create a data/ directory in your project folder and upload all your personal documents there. First, the documents need to be loaded, and then split into proper chunks before creating the vector embeddings based on them.
Chunking
Chunking the data is crucial for performing a good semantic similarity search. The most basic way of chunking would just be splitting the text based on a fixed length (Fixed-Size Chunking). However, this is not the best way to do it since we need to chunk while maintaining a semblance of the context. One way to do this is recursive chunking where the chunks are of similar size while maintaining context. To know more about the intricacies of chunking and its impact on inference, click here.
Vector Database and Embeddings
Once chunked, they are converted into vector embeddings with the help of our all-MiniLM-L6-v2 model and stored in Milvus, a vector DB. If you do not want to go for a traditional vector DB for now, you can also make use of the FAISS wrapper in Langchain to index and store the embeddings locally. For setting up milvus, make sure to pip install pymilvus.
The below code is run only once to create the vector database which will be used as a reference by our LLM to answer our queries.
Step 4: 🦜🔗 Langchain Retrival QA Object for vectorDB similarity search
Our vector database has been created based on our private documents. Now, we need to be able to search that vector database based on our query to the LLM, find the most relevant data and send it back to our LLM for inference. To better understand the entire workflow, check out the architecture of the whole process below.
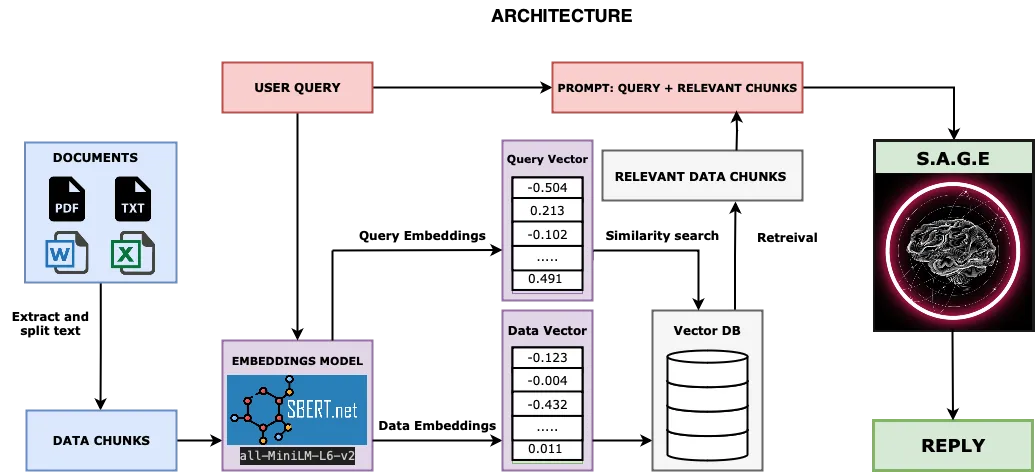
To enable searching the vectorDB, we will instantiate a RetrievalQA Object in Langchain. We basically pass the LLM object, vectorDB source, and the prompt (user query) to this object and it returns the nearest search result. In my case, I am only returning the most relevant search but you can get the top K relevant searches by modifying the search_kwargs parameter.
Step 5: Creating a custom prompt template
The custom prompt template is very helpful in giving an idea of what type of prompt you will receive from the user and the way your model has to respond. For example, I have used this prompt template below but you can make up your own based on your requirements.
This is just the most basic example of a prompt template. You can really make use of prompt engineering to design curated responses. For example, you could use a Few Shot Prompt template. This is a way of training the model on specific source data by providing a few examples.
For a more rigorous training on specific data, you must fine-tune the model on your private data. This can be done with a single-instance T4 GPU on Google Colab (It will take sometime depending on the size of the dataset) provided you make use of PEFT (Parameter Efficient Fine Tuning) techniques like QLoRA. For the fine-tuning code, check out my google colab notebook here. Check out this resource if you want to know more about QLoRA.
That’s about it for making your own personalized and secure A.I assistant. Click here to download the entire project code.
Stay informed with the latest guides and insights.